
Checkout forms and messages
Choose checkout fields and questions, write checkout and confirmation copy and terms, and set invoice emails.
Decide what you ask exhibitors at checkout, what they read along the way, and what they receive afterwards. These settings are on Registration & Orders, in the Forms, Messages and Integrations sections of the Setup tab.
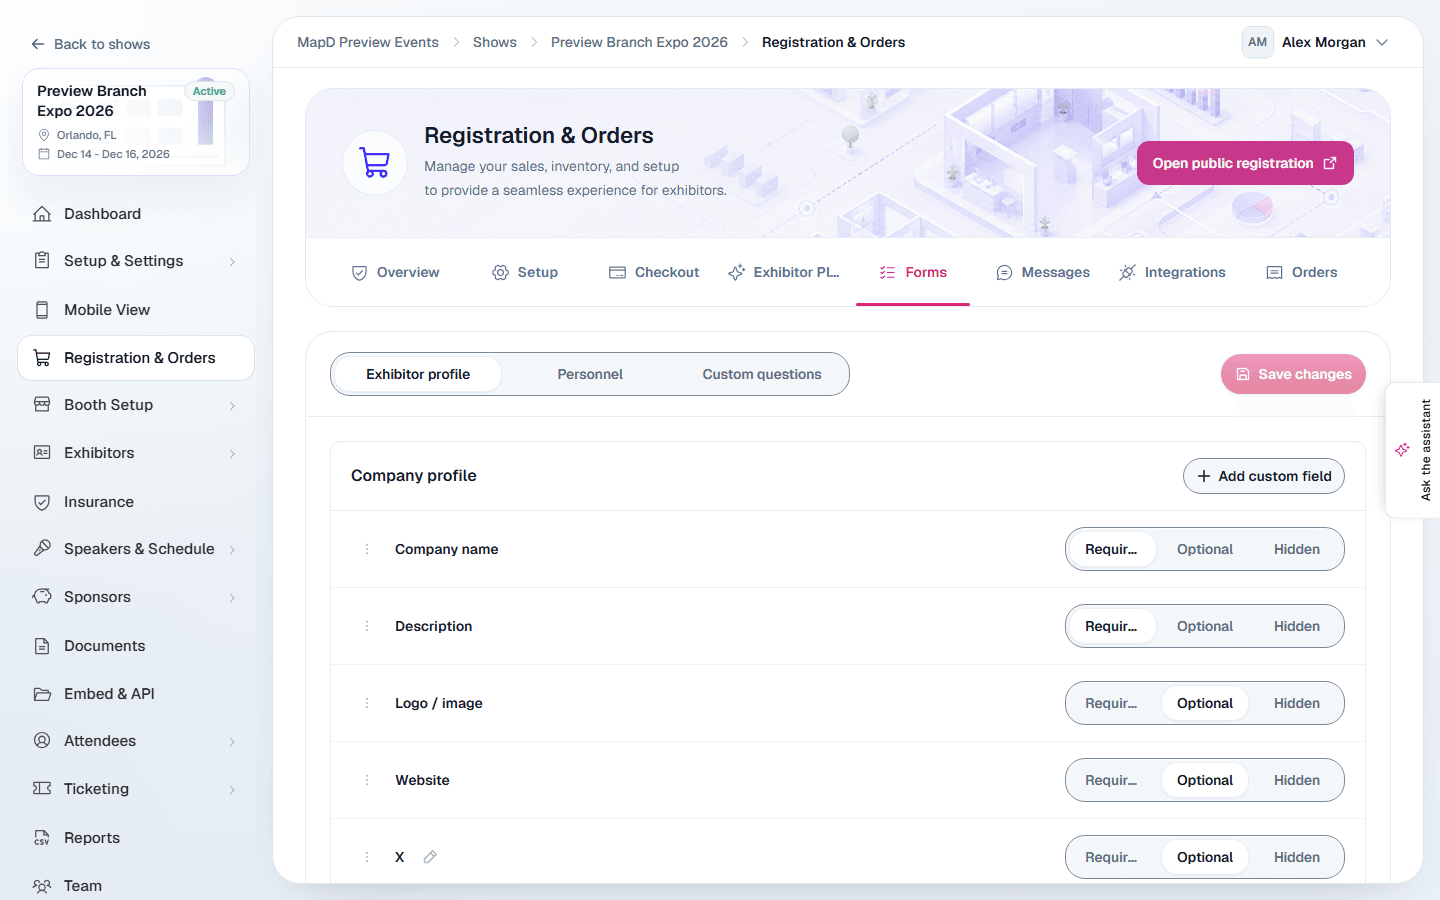
Forms
Switch between Exhibitor profile, Personnel and Custom questions at the top. The Exhibitor profile and Personnel views list every field buyers fill in, grouped into company profile, public contact, administrative contact and personnel. For each field:
- Choose Required, Optional or Hidden.
- Rename it with the pencil icon.
- Drag it to change the order.
Select Add custom field to add your own. The administrative contact email is always required, because order emails go there.
The administrative contact also has Address, Address line 2, City, State / Province, Country and Postal code, and the public contact has Address line 2 under Address. New shows ask for the administrative address as Required and each Address line 2 as Optional. On shows set up before these fields existed they start as Hidden, so nothing changes at checkout until you switch them to Optional or Required. When buyers tick Same as company/contact in Billing details, Map D uses this address; if it is hidden or blank, it uses the public contact's address.
Custom questions
On Custom questions, select Add question and choose a type: text, long text, yes / no, single select, multi select, file upload or number. Add Help text to explain what you need, and turn on Required if buyers must answer. Questions cannot be deleted. Turn Active off to stop asking one.
Each question also says who is asked. Ask everyone puts it on every order. Ask booth buyers only puts it only on orders that reserve or request a booth, so a sponsor buying sponsorships or services with no booth isn't asked "Do you need electrical power at your booth?". Those buyers skip the question even when it is Required, and their orders show no answer to it. Questions you added before this choice existed ask everyone.
For Single select and Multi select, use Answer options and Add option to enter each choice separately. Help text explains the question; it does not create choices. Fill in every option and use distinct labels before saving. Buyers choose one answer for single select or tick several answers for multi select. Yes / no supplies its choices automatically. Text, long text and number questions do not need options.
Use Save changes to keep your questions. The same choice controls are available when editing an order. An unanswered yes / no question stays unanswered until you choose a response.
For a file upload question, buyers attach a PDF or JPG of up to 10MB at checkout. The file is kept privately with the order: open it from the order's registration answers.
Messages
Checkout copy
Add a short message at key points of checkout: when buyers reserve a booth, and on the services, profile, personnel, questions and payment steps. Each message has a title, body, optional link, and an Enabled switch, with a live preview.
Buyers see the body and link of every enabled message: in the booth details panel when they select a booth, at the top of the services, exhibitor info and payment steps, and inside the Staff / personnel and Custom questions sections. To hide a message, turn Enabled off.
Confirmation
- Success heading and Confirmation message: what buyers see after they submit.
- Recommended next actions: a short checklist for buyers, such as completing their profile.
- Support name and Support email: shown to buyers on the confirmation page as "Questions about your order? Contact ...". Leave the email empty to hide it. The name defaults to Exhibitor Support. Nothing is emailed to this address: to hear about each order, add your team to Internal recipients under Invoice settings.
- Terms of service: turn on Require agreement and paste your terms. Buyers must scroll to the end and accept them before submitting. Turn on Also require agreement on the pay-your-balance page to ask for the same agreement when buyers pay a balance from an invoice or payment request link; until they accept, the payment buttons there stay off.
Invoice settings
Set the From name, Reply-to email, the Order confirmation email subject and Order confirmation email message, and your company details on the invoice. The Invoice email subject and Invoice email message are for the email sent with Resend invoice on an order, which has the invoice attached as a PDF; leave them empty for the standard wording. All four can use {buyer_name}, {company_name}, {event_name} and {order_number}. Choose who else gets a copy with Internal recipients and CC emails. Put each address on its own line, or separate several with commas or semicolons. An address that isn't valid is named when you save, so a typo can't quietly stop the emails. The switches control what is sent:
- Send invoice with order: the buyer's confirmation email with the invoice PDF.
- Send internal order notification: a copy of each order's confirmation email, with the invoice PDF, to your Internal recipients when the order is confirmed. Your team gets it even when Send invoice with order is off, and even when the buyer's own email can't be sent, for example because their address has a typo. An order paid by card is confirmed once the payment goes through.
- Include balance due details, Include booth assignment details and Include invoice link.
To match your event's colors, set Header background color and Header text color. They color the band behind the line-item headings (DESCRIPTION, QTY, UNIT PRICE, AMOUNT) on the invoice PDF, and Header preview shows how it will print. Set just one and the other uses gray or black. Leave both empty, or select Reset on each, for plain gray headings. If the text color would be hard to read on the background, the invoice prints black or white text instead and the preview says so.
Registration types and NOVI
On the floor plan before registration opens, visitors can browse with prices hidden and select Log in to see prices (or View prices for other registration methods) to verify their registration. They then see their prices for the scheduled opening day. This does not open booth selection or reservations early. Once registration opens, verification is required before visitors see prices or select booths.
In the Integrations section, Registration types let you offer different entry points, such as members and non-members. Select Add registration type and choose how buyers get in: no login, an Access code, NOVI member login, or NOVI login without a membership check. If you use NOVI, enter your NOVI connection details under NOVI SSO first.
Set up NOVI SSO
- In NOVI, create an SSO client (for example "Booth Sales Login") and an API key (for example "Booth Sales API").
- Under NOVI SSO, turn the switch on and enter the Client ID, Secret key, API key and NOVI URL, your association's NOVI site address such as https://www.yourassociation.org. Select Save NOVI settings.
- Copy the Redirect URL shown under the fields and add it to your NOVI SSO client as a valid redirect URL. NOVI refuses the sign-in until it lists this exact address. It's the same address for every show, so your NOVI SSO client needs it only once, and changing a show's URL slug doesn't affect it.
- Select Check sign-in setup. Saving the settings runs the same check. It asks NOVI whether it accepts your Client ID and Redirect URL, without anyone signing in, and shows the answer above the button: Members can sign in, Members can't sign in with what to fix, or Couldn't confirm with NOVI when your NOVI site can't be reached or doesn't give a clear answer. In that last case nothing changes for your members, and the next member sign-in confirms the setup.
- Add a registration type that uses NOVI member login or NOVI login.
NOVI member login lets in people whose NOVI membership is current (or inherited from their company) and who belong to a member company. NOVI login lets in anyone with a NOVI account. Either way, the company's name, address, phone, website and QuickBooks customer are filled in at checkout, and the order is placed under the company name from NOVI. A sign-in lasts 12 hours on the buyer's browser.
The Secret key and API key are only used once a member signs in, so the check can't test them. When a member's sign-in fails because of a setting (for example a Secret key that no longer matches the NOVI SSO client), the NOVI SSO settings show Members can't sign in with the reason. Check sign-in setup doesn't clear that reason, because it can't test those keys. It clears when a member signs in successfully, or when you save the NOVI settings with a change or a key typed in again (for example a new Secret key, or the same API key after you fixed what it can read in NOVI). The check then runs as usual, and the next member sign-in confirms the keys.
While members can't sign in, an alert, Members can't sign in with NOVI, also appears at the top of every page of the show and on your organization's home page, with the reason and an Open NOVI SSO settings button. See Alerts when buyers can't sign in or pay.
If a buyer sees "NOVI sign-in didn't complete", open the NOVI SSO settings and select Check sign-in setup. The usual causes are a redirect URL missing from the NOVI SSO client, or a Secret key that no longer matches it.
Shows that were set up with NOVI before the shared address keep signing in through their own, older address, shown under the Redirect URL. Add the Redirect URL to your NOVI SSO client and select Check sign-in setup: once NOVI accepts it, the show switches to it, and you can remove the older address from NOVI.
NOVI product mapping
Once NOVI SSO is on, NOVI product mapping lists your NOVI purchasable items so you can pick one for Booths (including discounts and fees) and for each service, then select Save mapping. Each item carries its QuickBooks item, so these choices are the same item mappings as QuickBooks Books sync. NOVI doesn't list every item in your QuickBooks company, so when QuickBooks is connected the list also has Other QuickBooks items, with the rest of your QuickBooks items. They only reach QuickBooks when QuickBooks is connected and Books sync is on (see Set up payments). An item left unmapped posts to the Default / fallback item.
When QuickBooks is connected, each line also has a class picker next to the item, so the invoice line gets the QuickBooks class you want. Pick No class to leave it off. A line needs an item before it can have a class. The class is the same one Books sync shows for that line, so changing it on either screen changes both, and changing only the item here keeps the class. If your exhibitors register in RainFocus, RainFocus booth selection in the same section lets them pick booths on your floor plan. See RainFocus booth selection.
Buyers pick a registration type before they see prices. Until they do, no prices reach their browser, and afterwards only the prices for their own type do, so a buyer can't look up another type's rates. See the exhibitor guide Registration types and access codes. Map D checks their choice again when they reserve a booth and when they submit the order, so a registration type can't be skipped, and each order records the type it was placed under. When you edit an order, User registration type shows it and lists your show's registration types.
Still need help?
Contact your Map D account team. Include your show name and, if something looks wrong, a screenshot of the page.
Last updated November 16, 2026