
Your show's mobile app
Design your app with tiles and blocks, preview it live, release it, and run its check-in, polls, networking and challenges.
Your show's mobile app gives attendees your exhibitors, floor plan, schedule and more on their phone. Everything that only affects the app is under Mobile View in the show sidebar:
- App Designer: design the app and release it.
- Notifications and Ads.
- Check-in & Feedback and Polls & Q&A, for your sessions (with Speakers & Schedules).
- Networking: attendees connecting and chatting, and their reports.
- Challenges: points and the leaderboard.
In the App Designer, App features at the top opens the same pages.
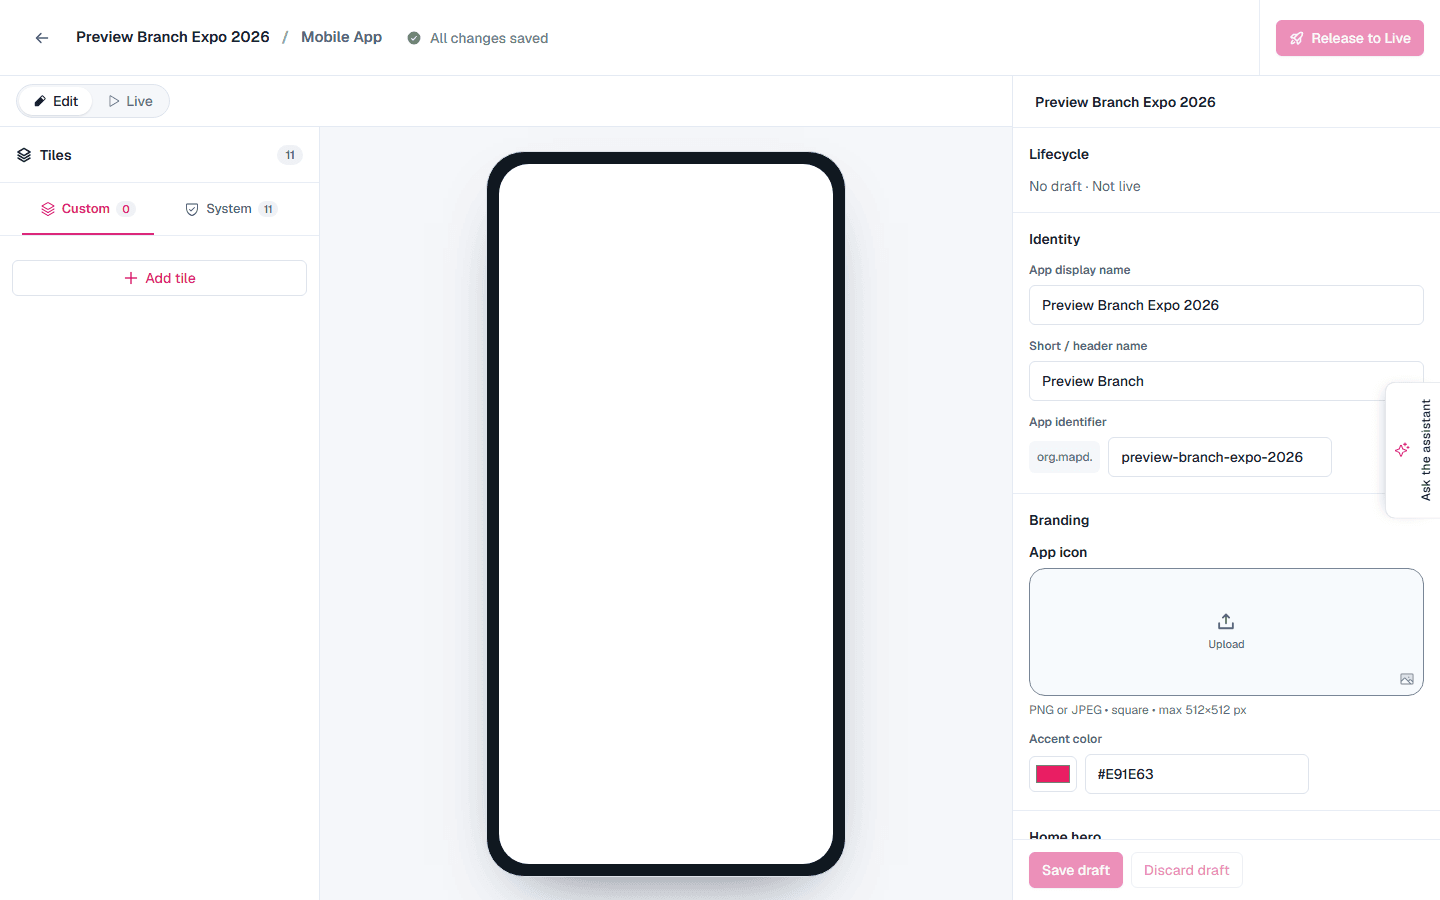
Edit and Live
The switch at the top has two modes:
- Edit: build your app with the block editor.
- Live: run the full app with your unsaved changes, to try it the way attendees will.
In Live, choose a device frame, from a standard phone and a large phone to a tablet in portrait or landscape, to see how it looks on each.
Build your app
- Tiles are the buttons on the app's home screen. Select Add tile and give it a label and icon, then choose what it opens. Filter between Custom tiles you made and System tiles.
- Structure holds the blocks on a page. Select Add block to add a heading, rich text, image, gallery, button, video, link list, location list, divider or spacer.
An image block can span the page or sit as a smaller inset on the left or right: choose its Placement. A button can open a page, a website or an uploaded file.
Select a tile or block to edit it in the inspector. The app-wide settings are there too:
- Identity: the app display name, short header name and app identifier.
- Branding: the accent color, and the app icon a branded app of your own would use in its store listing. The Map D app doesn't show the icon.
- Distribution: whether the app is listed in the public app directory.
- Home hero: the banner at the top of the home screen.
- Home screen: a background image, the top strip's color and a sponsor bar.
- Session times: which time zone the app shows session times in.
- Display: how exhibitors, session videos and saved items appear.
The home screen
The Home hero section controls the top of the home screen:
- Banner image: a wide image across the top of the hero, above the show name. It uses your show thumbnail unless you upload a different image. Choose its Size: Full width fills the hero, and Large, Medium or Small suit a logo. At the smaller sizes, choose its Alignment: Left, Center or Right.
- Hero background: an image that fills the hero behind the banner and the event details, tinted with your accent color so the text stays readable. Leave it empty for a solid accent color.
- Text alignment: place the show name, the event details and the buttons on the Left, in the Center or on the Right.
- Title, Venue, Location and Dates: turn each one on or off, or type your own text. Left blank, each shows your show's details.
- Website button: a button that opens your event website. It uses the website in your show details unless you enter another address, and you can change the button text.
- Contact button: a button beside Website that opens your show's contact details. It uses the public contact info in your show details unless you type your own, and you can change the button text. With no contact details, there's no button.
The Home screen section adds:
- Home screen background: an image shown behind the tiles, below the hero. Pick one that keeps the tiles readable.
- Top strip color: the strip at the top of the home screen that shows your sponsors or ads, and scrolls away with the page. Your ads on other screens use the same color. Choose Dark (the default), Show color for your accent color, or White. On Dark and Show color, each sponsor logo sits on a small white card, so logos with dark lettering stay readable.
- Sponsor bar: turn it on to rotate through your sponsors' logos, one at a time, in the strip at the top of the home screen. While you have home screen ads, the ads show there instead. Tapping a sponsor opens its exhibitor profile, or its website if it has no profile. Choose how many Seconds per sponsor, and pick Sponsor levels to show only some of them. With no levels picked, every sponsor with a logo appears.
Apps you released before these options existed keep their current look until you turn them on.
Location lists
A location list shows places, such as hotels, restaurants or parking, on a map. Each place has its own page in the app with a map, a Directions button and links to the previous and next place, so you don't need sub-pages for them.
To start one, select Add tile, then Locations. The tile's settings list its places; select Edit places to add or change them. More pages is only for extra pages under the tile, such as a parking guide.
To add a place, select the list, then Add location. In Map & address:
- Type in Search for a place and pick a suggestion to fill in the address and the map pin at once.
- Or type the Address. When you stop typing, the address is found on the map and the pin and the preview's map update straight away. If it can't be found, you'll see a note: add the city, or set the pin by hand.
- Set the pin by hand takes a latitude and longitude, for a spot the address can't find, such as a room inside a large venue.
- A small map shows the pin attendees will see. No map pin yet means the place has no pin yet.
Use Exhibitors here to feature exhibitors on the location's page, and Sponsored by to show sponsors on it. Attendees can tap through to each exhibitor's profile and each sponsor.
Display settings
The Display section changes how the app presents your content:
- Hide booth information: hides booth numbers and the Locate on map buttons.
- List exhibitors without a booth: turn off to list only exhibitors that have a booth.
- Exhibitor description length: how many characters of each exhibitor's description show before Read more. Leave it empty to show the whole description.
- Hide live video and Hide recorded video: hide session live streams and online meeting links, or session recordings.
- Exhibitor profile sections: rename the Contact, Team, Products & services, Photos and Videos sections of exhibitor profiles, or turn one off to hide it.
- Saved tabs: choose which kinds of saved item attendees see under Saved. Signed-in attendees can add their own note to anything they save; only they see it.
Apps you released before these settings existed keep their current look.
App notifications
Send announcements to your app's Notifications tab: select Notifications at the top of the page, then New notification.
- Title and an optional Message.
- When tapped: nothing, a screen in the app (such as the schedule or an exhibitor), or a website.
- Who gets it: everyone using the app, or only attendees who have signed in.
- Send: now, at a set time, or save it as a draft to send later.
You can edit a scheduled notification or a draft until it goes out. A sent notification can't be changed, but deleting it removes it from the app.
Event codes
An event code lets attendees open your event in the app even when it isn't in the app's public list of events. Turn off List in public app directory to keep your event out of the list, then share the code with your attendees.
- Select Event code at the top of the page.
- Type a code, or select Generate a code. Codes are 4 to 24 letters and numbers. Case, spaces and dashes don't matter.
- Select Save code.
Attendees tap Enter event code on the app's list of events. The code works once your app is released, and a phone keeps access for 90 days.
Changing or removing the code takes effect right away: phones that used the old code lose access until they enter the new one.
Session times in the app
The app shows session times in your event's time zone, labeled with the zone's abbreviation, such as EDT. Set the time zone in your show details. What's live and what's up next follow the event's time wherever the attendee is.
For an online event, turn on Use each attendee's time zone under Session times. Times then convert to the time zone set on each attendee's phone, still labeled with the zone.
When your sessions have tracks, attendees can filter the schedule by track. Only tracks with sessions appear.
Exhibitor profiles in the app
Exhibitor profiles in the app follow the same rules as on your Homebase. Every exhibitor shows its description, contact details, social links and sponsor level. Exhibitors with Exhibitor Plus also show their booth staff, products and services, photos and videos, for each feature your show includes. Booth staff show their photo, bio and Book a meeting link, never their email or phone. When the contact form is on, attendees can send the exhibitor an inquiry from the app.
Three tiles help attendees find more:
- Products, a system tile that's hidden until you turn it on, lists every product your Exhibitor Plus exhibitors publish. Attendees can save products to find them again under Saved.
- Event documents, a system tile that's hidden until you turn it on, lists the documents you set to Show on the floor plan on your show's Documents page, in the same order. A file opens for download and a link opens its page. It updates by itself when you change your documents.
- Documents, in Add tile, starts a page with a list of files to download, such as guides, maps and forms. Upload each file to its link.
Show details in the app
The show's info screen in the app shows your description, dates and time zone, venue and address, event website and public contact, including to attendees who haven't signed in. When ticket registration is published, a Register button opens your ticket page.
Attendees reach it from the list of shows. To put it on your app's home screen as well, turn on the Event info system tile in the App Designer. It always shows your show's current details.
Floor plans in the app
The app's Maps screen shows your published floor plans. When your show has more than one, attendees switch between them with the level buttons at the top, in the order you set for your maps. Archived and unpublished maps don't appear.
On an exhibitor's profile, Locate opens the floor plan on that exhibitor's level with its booths highlighted. If your show has wayfinding turned on and walking paths drawn, Directions opens the route to the booth.
Attendee sign-in in the app
Attendees sign in to your event in the app with the same account they use on your event's page, following your event login settings:
- Sign in with their email and password, or ask for a sign-in link by email and tap it on their phone.
- Create account appears when you let attendees sign themselves up, and asks for your signup password if you set one. If new accounts must confirm their email, the app asks them to follow the link first.
- Someone who signs in but isn't registered for the event sees your Register button when ticket registration is open.
Signed in, attendees can also check in to sessions and rate them, vote in live polls and ask questions, connect and chat with each other, and earn points, when you turn those on (below).
Signed in, attendees can edit their profile and photo, change their password, and delete their account from the app. Deleting an account removes their name, contact details and photo from your event and signs them out; their ticket orders stay in your records.
Check-in and feedback
Attendees signed in to your app can check in to a session and tell you what they thought of it. Under Mobile View, select Check-in & Feedback, then turn Check-in or Feedback on for each activity, or select Every activity.
- Check-in opens 15 minutes before the session starts and closes when it ends. Attendees can undo it while it's open.
- Feedback opens when the session starts and stays open. Attendees rate the session from 1 to 5, can say what they liked and what could be better, and can ask you to follow up. They can change their answers later.
Times follow your show's time zone. A session with no date or start time takes check-in and feedback whenever they're on; one with no end time counts as an hour long.
The page also shows, for each session, how many attendees checked in, how many rated it, the average rating, and how many asked for a follow-up. Download the check-ins or the feedback as a spreadsheet. Feedback shows who sent it only when they asked you to follow up.
Live polls and Q&A
Run polls and take questions during a session in your app. Under Mobile View, select Polls & Q&A, then the session. Its page updates every few seconds while it's open, so you can keep it on screen during the session.
- Polls: select New poll, write a question and 2 to 10 choices, and save it. Attendees can't see it until you select Open. Signed-in attendees vote once and can change their vote until you Close it. Results come in live; turn on Attendees see the results to show them to attendees after they vote and once the poll closes. A poll can be reworded only before it opens.
- Q&A: turn on Take questions. Signed-in attendees ask questions in the app, and other attendees see a question only once you Approve it. Attendees upvote approved questions, which are listed with the most upvoted first. Mark answered when a question has been covered, or Hide one to take it down. Attendees can ask anonymously: other attendees see no name, but you still see who asked.
The Polls & Q&A list shows how many questions are waiting for approval in each session.
Networking and chat
Under Mobile View, select Networking and turn on Attendee networking. Signed-in attendees can then connect with each other in your app, and message the people they're connected with. Each side sees the other's email and social links only if that person hasn't hidden their contact info, and attendees who hid their profile can't be found. Networking needs Event Login on (under Attendees > Ticketing Setup).
Attendees can block someone, which ends their connection and their chat, and report someone or one of their messages to you. Reports appear on the same page, with the message as it read. Review each one and act on it, for example by removing the attendee's event access, then select Mark reviewed.
Challenges and the leaderboard
Give attendees points in your app for taking part: under Mobile View, select Challenges, then New challenge. Choose what earns the points:
- Check in to a session, Rate a session, Vote in a poll or Ask a session a question: points for each session or poll, once each.
- Connect with an attendee: points for each new connection, for both people.
- Scan a code: a code for a booth or a session. After saving, download its QR code and print it. Each attendee scans it once.
Set Times per attendee to cap a challenge, or leave it empty for no limit. Turn a challenge off to stop it giving points; deleting it takes back the points it gave. Only signed-in attendees earn points, and the points are awarded by Map D, not by the app. The Leaderboard lists attendees by points; attendees who hide their profile earn points but aren't listed.
Attendees see their points, the challenges and the leaderboard on your app's Challenges tile: turn it on in the App Designer.
Shared links
Attendees can share your event, an exhibitor, a session or a speaker from the app. The link opens the app on phones where it's installed. Everyone else gets a page with the app's store buttons and a link to the same thing on your Homebase, or to your Homebase's list when there's no page for one item.
Save and release
Your changes are a draft until you release them:
Save draft
Select Save draft at the bottom of the rail. Discard draft throws your changes away.
Release to Live
Select Release to Live to publish the saved draft to attendees' phones. The button is available once the draft is saved and has no unsaved changes.
The Lifecycle panel shows your draft and live version numbers, so you always know whether attendees have your latest changes.
Apps moved from your previous platform
If your show moved to Map D from your previous platform, its app came with it as a saved draft: the menu in the same order, with the same labels and the pages that were turned off still off, your content and link pages, location lists, accent colour and logo. Tiles Map D has that your old app didn't start turned off, except My profile, and Notifications when you sent notices. Your notices appear under Notifications, and the event code your attendees used keeps working once the app is released. Until your move date the app is view-only and attendees don't see it; after it, review the draft and select Release to Live.
Still need help?
Contact your Map D account team. Include your show name and, if something looks wrong, a screenshot of the page.
Last updated September 30, 2026